What makes a good render? - The foundation
- Ava Obrien
- Nov 21, 2025
- 4 min read

Updated: Nov 25, 2025
Opening up a 3D software, whether it be Blender or Maya, can be quite overwhelming.
You may find yourself asking, "Where on earth do I start?!" That's what this post is all about—the fundamentals of showing your vision to the world.
The Main Model
When creating a scene, your viewer should be drawn naturally to one specific part of the image. This is your main model. Your model should jump off the screen and make the scene look complete. Ask yourself, "How do I determine if the main model draws enough attention?"
To test this, hide the main model in the viewport and see what changes. Does the image feel incomplete? No longer interesting? Now unhide the main model. Does it feel more complete now? If yes, you have successfully drawn the viewer's eye to the correct part of the scene. Well done!
When designing a 3D environment, we need to discuss details. Details on your mesh (A mesh is the fundamental structural "skin" of any 3D object. It's a collection of components that define the object's shape: Vertices, Edges and Faces.) are important for showing off the object's structure. The more details the mesh has, the more defined the mesh is.
You can add details by creating more vertices. There are 3 Main kinds of meshes: High Poly, Medium Poly and Low Poly. These describe the poly count and determine the amount of detail your mesh can have. When creating a scene in 3D, the objects that are higher poly often are closer to the camera.
Camera positions
The next biggest element to a good scene is the camera. The camera is a virtual lens that your viewer will look through. Just like any other camera, you can adjust the settings to fit your creative vision. When creating your scene, it is important to be aware of where the camera is positioned in the scene. There are multiple ways to position the camera to give off different and more interesting renders and scenes. Here are some basic examples:


Rule of Thirds: Imagine your frame divided into nine equal parts by two horizontal and two vertical lines. Place your key elements along these lines or at their intersections to create a balanced, engaging shot.
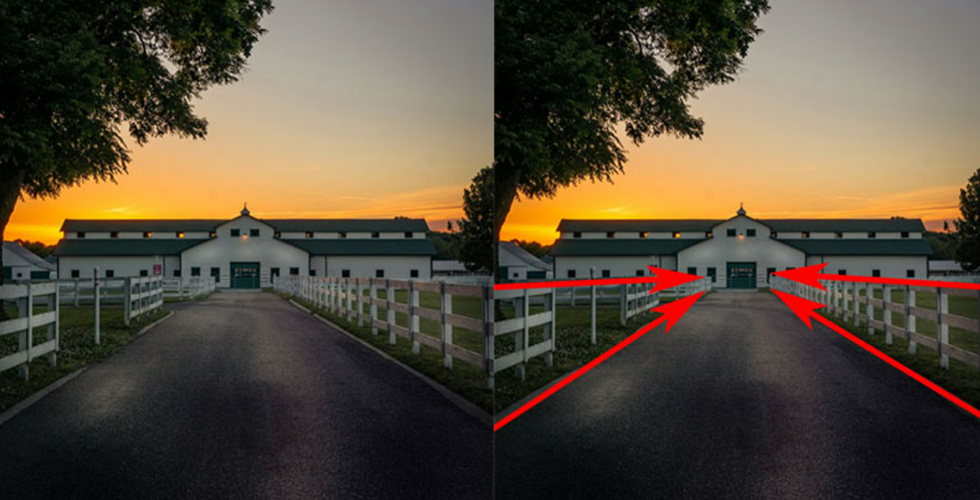
Leading Lines: Use natural or man-made lines (roads, rivers, fences, shadows) to guide the viewer's eye into and through the photograph, often toward your main subject.
Frame within a Frame: Use elements like windows, arches, doorways, or overhanging branches to frame your subject. This adds depth, context, and focuses attention.
Symmetry & Reflections: Perfect for creating a sense of order, calm, and power. Reflections in water, glass, or symmetrical architecture are classic uses.
Centre Composition: Placing your subject squarely in the centre can create a very powerful, direct, and stable image, especially if the subject is strong and the background is simple.
These are examples of the Rule of thirds, leading lines, frame within a frame, symmetry and reflection and centred view. Here are some helpful links to learn more about how to shoot your scene.
Source of the images above:
When following these rules, it is also important to think about what the story is behind the image. What is happening in the scene? How do you want the viewer to feel? Most of my renders I have created have dark undertones, and I use and dark colour to express the depth of the scene while using minimal light.
The magic of Lighting
Look around you. Where is the light coming from? For me, at this moment, I'm writing this blog, it's coming from the office lights above me and the window to my right. In nearly any image or environment, there is always more than one light source. Even if it is outside in the middle of the day. There will usually be 1 main source in a scene. (This is usually the most powerful and most influential light.) Depending on the atmosphere you want to create, adding a cooler light source can give the feeling of cold, isolated, present time where whereas a warmer tone can give the impression of heat, positive feelings and a feeling of nostalgia.
Extra light sources can hep define the main light source by creating contrast. These extra light sources are often low intensity and may be emitting different colours or shades to highlight other background objects.
Light bounces and reflects off of many different kinds of materials, such as glass or metal. Light can also be absorbed into materials, for example, when light is absorbed and scattered through your skin.

Light is absorbed through the skin and makes the ear glow red. The lighter sections of the ear are where the skin is at its thinnest. The darker areas are where the light is being absorbed more within the material before it reaches the eyes.
When creating a character or even other objects, you can make your materials more realistic by mimicking how they interact in the real world.
When combining good-quality models with good camera positions and appropriate lighting, your 3D projects will improve dramatically!
Thank you for reading!
Ava O'Brien
21/11/2025

Comments